  • About
  • Library
  • News
  • Events
  • Directory
Apply Give
WSU Logo against a transparent background
  • Component Overview
      Component Overview
    • Accordions
  • Commencement
  • Academic Calendar
  • OneCard
  • Registrar
  • Bookstore
  • Housing
  • Tuition
  • Financial Aid
  • Transcript
  • FAFSA
  • Counseling Services
  • Component Overview
      Component Overview
    • Accordions
  • Component Overview
    • Accordions
  • About
  • Library
  • News
  • Events
  • Directory
  • MyWooState
    • Blackboard
    • Gmail
    • Self-Service
Apply Give
WSU Logo against a transparent background WSU Logo in white text against a transparent background
[...] Office of Communications &... Communications Toolkit Getting Started with WordPress
Posts

Posts


IN THIS SECTION
  • Getting Started with WordPress
    • Pages
    • Posts
    • Media
  • Component Overview
    • Accordions
    • Action Bar Callout
    • Blocked Link Buttons
    • Callouts Bar
    • Card Carousel
    • Color Block Grid
    • Content Callout Blocks
    • Featured News
    • Featured People
    • Featured Posts
    • Grid Blocks
    • Grid Columns
    • Hero Slider
    • Icon Listing
    • List Faculty & Staff
    • List with Info Box
    • News & Events
    • Photo Gallery
    • Portrait Video Carousel
    • Spacer
    • Related Links
    • Tabs
    • Testimonials
    • Timeline
    • Video Listings
    • Virtual Tour
    • Word Revolve
    • WYSIWYG
  • Content Writing Guide
  • Design Styling Guide
  • Web Culture Guide
Contact Office of Communications and Marketing
Shaughnessy Administration Building
Suite A-258
wsumarcom@worcester.edu
508-929-8618
    • Quick Tips
    • Basic Post Functionalities
    • How to Update
      • How to create a new post
      • How to edit an existing post
    • FAQs
    • Quick Links

Quick Tips

  1. The term Post is interchangeable with the term Blog, you will see these two terms used throughout this training guide.
  2. Before publishing a new post, the draft page should be inspected and viewed on mobile to ensure the content is appearing correctly for a mobile user.

Basic Post Functionalities

The posts library can be accessed from the main WordPress navigation menu that extends vertically down the left-hand side of the page. Clicking on the posts tab will bring the content manager right to the post library within that site.

At the top of the post library, the manager will see Posts with a button to the right that reads Add New. This button is where managers can create new posts.

Below this, the content manager will see the words All, Mine, Published, Draft and, Trash. These are the different sections of the posts library. Clicking on all will allow the content manager to view all the posts within this site. The Mine tab will show a posts library composed of posts that a particular user created.

Published will show the manager all of the live posts that have been published on the website and are visible to the public. The draft library will show the content manager all of the working drafts within this site, these posts have not yet been published and are not visible to the public.

The Trash library shows the manager the posts that have been moved to trash. While the pages here are in the trash, they are not technically removed from the website. These posts are still recoverable. The content manager will be able to permanently delete pages within this post library.

Below the different post sections, the manager will see Bulk Actions followed by a dropdown, a button that reads Apply, and a dropdown that reads All Dates and Filter. These are tools to better allow the content manager to organize this library. The bulk actions allow the manager to clone, or trash multiple posts at once. The manager will just have to select the desired action and apply that action by clicking the Apply button.

The dates dropdown allows the manager to organize the posts in the order desired and selected within the dropdown.

To the right of this, the content manager will see a search bar, with a button that reads Search Posts. This allows the content manager to search pages based on the title, date it was published, or the post’s author.

Within the posts library, managers will be able to sort the posts based on title, author, and the date it was published. The manager just has to click on the Title, Author, or Date link at the top of the posts library.

Below the post’s library screen, the content manager will see a number in the right-hand corner. This is the number of posts within this post’s library. As more posts are created, the content manager will notice that there are only a set number of posts that can be shown within one post of the media library. The user will see Page 1 or 2, letting them know what page of the posts library they are on. Clicking the side arrows will allow the manager to switch between library posts.

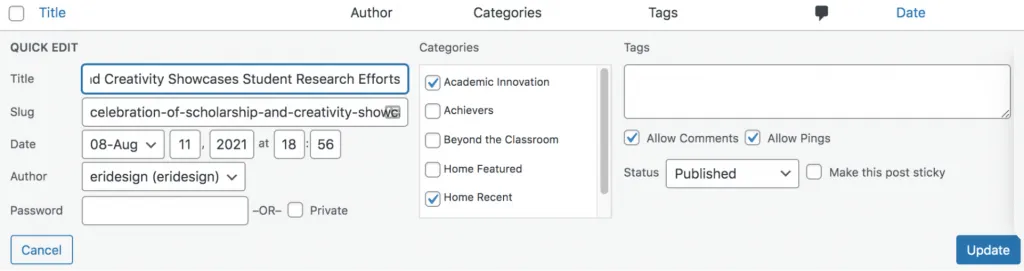
Hovering over a posts item within the media library shows the content manager a few different editing options they can make. They will see the following options, Edit, Quick, Trash, Clone, & New Draft. Clicking on Edit will take the content manager to the backend of that particular post where they can make edits. Clicking on Quick Edit allows the manager to make a quick edit to the post settings, such as:

The Trash option allows the manager to trash the page which sends it to the trash. Remember, the post is not permanently deleted when this happens, permanently deleting the post needs to be done in the trash library.

Clicking on Clone will make an exact clone of the post, this new cloned post will appear in the post library with the same title as the original post cloned but it will be a draft. It is best to do a Quick Edit and quickly rename this draft to prevent confusion in the library. Clicking on New Draft does the same.

How to Update

To create a new post, click on the Add New button next to the top left corner of the post’s library.

The manager will then be taken to the backend of the new post they are creating. The post’s template automatically defaults to the default template when a new post is created.

  • This is where the content manager can select which category this post falls under. Multiple categories can be selected at once. To select a category, click the checkbox to the left of the category title. Content managers can either scroll through a list of all categories or scroll through a list of the most used categories.

    If the post they are publishing does not fall into an existing category, the content manager can add additional categories by clicking the Add New Category.

  • Each post has a featured image that is selected to be the face of the post. This is what users will see when this post is linked to places on the website. This is the main image of the post.

    Content managers can click the Select Featured Image link. This will open the media library where they can select an image.

  • The first button the content manager will see in this section is the Save Draft button and the Preview button. As content managers, the preview button will be their best friends. The save draft button allows the manager to save the current draft. Clicking the Preview button will open up a preview of the most recent draft in a new window. This is where managers will see what their post will look like to the public.

    If the manager opens a preview and continues to make additional edits on the backend, the preview will have to be refreshed to apply the additional edits.

    The status icon tells the content manager the current publication status of the post. The visibility icon tells the content manager what the visibility of the page is whether it is public or private. The public icon allows the manager to schedule when the post will be published.

    The copy to a new draft link opens up a copy of the post in a new window. Finally, the Publish button allows the content manager to publish the page and make it available to the public, or what we call, pushing a post to the front end. The content manager will notice that this button text changes from Publish to Update when the post is published, which allows the content manager to make changes to an already published post.

  • The tags section is where content managers can select which tags are assigned to this particular post. Tags are a pre-defined taxonomy in WordPress and they allow for the grouping of posts based on similar themes.

  • When the Content manager publishes a post, they will see the permalink appear right below the title of the post in the backend. This is the URL of the post they just published. They are able to make small changes to the URL by clicking on the Edit button.

    URLs should never include spaces, and words should always be spelled correctly. If a content manager has any questions or concerns surrounding their URL, they should reach out to the Communications & Marketing team for guidance.

  • When publishing a blog post, Content managers will find that they need to specify an author. For the purposes of this website, the actual author of the post does not have to publish the post, but that individual should be selected from the list of post authors. If this is not done then the blog will appear to be published by the content manager.

    The author of the post could be the department chair or selected faculty, but this should be solidified before drafting the post. Any content managers with questions surrounding this should reach out to the Communications & Marketing team.

  • A content manager will see different sections when they add content to a blank post. To view how to add content to these components, click the links.

    • WYSIWYG
    • Callouts Bar
    • Card Carousel
    • List with Info Box

Each component can be collapsed to allow for more organized content management. Clicking on the small filled triangle on the right-hand top corner of the section will collapse the section.

When finished, the content manager should collapse all sections and save them to clean up the back end of the post for the next user.

After publishing a new post, the published post should be inspected and viewed on mobile to ensure the content is appearing correctly for a mobile user.

A content manager can leave the post without publishing, but leaving a post without saving the draft will result in all progress lost within that editing period. It is recommended to save the draft multiple times throughout editing, just as one would while editing a Word document.

Editing an Existing Post

To edit an existing post, the content manager will click on the post they wish to apply changes to. They will then be taken to the backend of the post where they can perform their edits.

Components can be reordered by dragging and dropping them within a content section. To apply all edits made, the content manager will need to click the Update button. Content managers will be able to preview their work by clicking on the Preview Change button. No edits should be published without first checking what they look like visually in the post preview.

URLS of a published post can be changed, but this is not recommended and will likely require a redirect link. To edit the URL of an existing post, please contact the Marketing & Communications team.


FAQs

  • To share a preview from the backend of a post, click on “Preview Changes” in the top right boxed section that reads “Publish”. This will take you to the preview in a new window.

    From this page, you can copy the link in the URL, and share that link with the individual you’d like to share. That individual must be logged into the website, or else they will see a 404 error page. You will not be able to share a preview with a non-user.

  • Categories cover a broad range of topics, while tags are targeted to a smaller scope, and let the content manager micro-categorize their content.

    Another difference between the two is that WordPress posts must be published under a category, while tags are optional. Posts that are not given a specific category will be published in an Uncategorized category.

Quick Links

Web Culture Document
Design Styling Guide
Content Writing Guide
Contact Office of Communications and Marketing
Shaughnessy Administration Building
Suite A-258
wsumarcom@worcester.edu
508-929-8618
WSU Logo in white text against a transparent background
Quicklinks
  • Academics
  • Admissions & Aid
  • Campus Life
  • Community Impact
  • Alumni & Giving
  • En español: Admisiones y Ayuda
Helpful Links
  • Bookstore
  • Careers
  • Directions
  • University Police
  • Administrative Offices
  • Campus Map
  • Transcript Requests
Connect with us on Social Media
CONTACT US
Copyright © 2025 Worcester State University
  • Student Consumer Information
  • Campus Accessibility
  • Privacy Policy
  • Public Records Requests