Suite A-258
-
- Quick Tips
- Basic Page Functionalities
- How to Update a Page
- How to create a new page
- How to edit an existing page
- FAQs
- Quick Links
Quick Tips
- Each section has components that have been designed and developed for this section specifically. Components can be added by clicking on the “Add Section” button, which opens a list of components that can be used within this particular section.
- Each section can be collapsed to allow for more organized content management. Clicking on the small filled triangle on the right-hand top corner of the section will collapse the section.
- When finished, the content manager should collapse all sections and save them to clean up the back end of the page for the next user.
- Before publishing a new page, the draft page should be inspected and viewed on mobile to ensure the content is appearing correctly for a mobile user.
- A user can leave the page without publishing, but leaving a page without saving the draft will result in all progress lost within that editing period. It is recommended to save the draft multiple times throughout editing, just as one would while editing a Word document.
Basic Page Functionalities
The pages library can be accessed via the vertical sidebar on the left-hand side of the backend screen. Clicking Pages will take the content manager to the pages library where they will view all the pages within this site.
At the top of the page’s library, the manager will see Pages with a button to the right that reads Add New. This button is where managers can create new pages.

Below this, the content manager will see the words All, Mine, Published, Draft and Trash.
- Mine – shows a pages library composed of pages that a particular WordPress user created.
- Published – shows the manager all of the live pages that have been published on the website and are visible to the public.
- Draft – will show the content manager all of the working drafts within this site, these pages have not yet been published and are not visible to the public.
- Trash – shows the manager the pages that have been moved to trash. Pages in the trash are not technically removed from the website and they are recoverable. The content manager will be able to permanently delete pages within this trash library.
Below the different page sections, the manager will see Bulk Actions followed by a dropdown, a button that reads Apply, and a dropdown that reads All Dates and Filter. These are tools to better allow the content manager to organize this library. The bulk actions allow the manager to clone, or trash multiple pages at once. The manager will select the desired action and apply that action by clicking the Apply button.
Within the pages library, managers will be able to sort the pages based on title, author, and the date it was published. The manager just has to click on the Title, Author, or Date link at the top of the page’s library.
Hovering over a page item within the media library shows the content manager a few different editing options they can make. They will see the following options, Edit, Quick, Trash, Clone, & New Draft. Clicking on Edit will take the content manager to the backend of that particular page where they can make edits. Clicking on Quick Edit allows the manager to make a quick edit to the page’s settings, such as:

Clicking on the Update button will save these changes, and the Cancel button will cancel the edit the manager made.
The Trash option allows the manager to trash the page which sends it to the trash. Remember, the page is not permanently deleted when this happens, permanently deleting the page needs to be done in the trash library.
Clicking on Clone will make an exact clone of the page, this new cloned page will appear in the pages library with the same title as the original page cloned but it will be a draft. It is best to do a Quick Edit and quickly rename this draft to prevent confusion in the library.
Making Updates
Creating a New Page
To create a new page, click on the “Add New” button next at the top left corner of the page’s library.
The manager will then be taken to the backend of the new page they are creating. The page’s template automatically defaults to the default template when a new page is created.
-
The page template refers to the template coded to hold the content within this page. With more experience and exposure to the website, content managers will know which templates work best for the content needs they have.

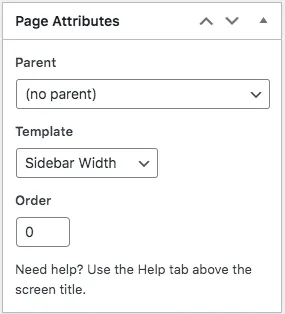
For example, many of the Academic Department pages have sidebar menus because they are all parent pages. The template where the manager inserts the content needs to be reflective of the sidebar, so the template that should be used is the Sidebar Width template. This is controlled by the Page Attributes section on the right-hand side of the screen.
The Page Attributes section is where the parent page is selected. A parent page is a top-level page that has child pages nested under it. In terms of academic department pages, the department page is the parent, and the program pages are child pages beneath it. This helps with the organization of website pages and assists with user navigation.
Clicking the dropdown menu will open up and list all of the pages published within this particular site. Any of those pages can be selected to be the parent, but parent pages are specially selected and optimized. If content managers have any questions about what parent to select, they should contact the Communications & Marketing team.
The manager will also see Order below the template field. This setting is important if the manager is creating a child page. The order field refers to the order in which the child pages are listed in the sidebar menu on the front end. 1 is the first slot in the sidebar menu, 2 is the second slot, and so forth.
-
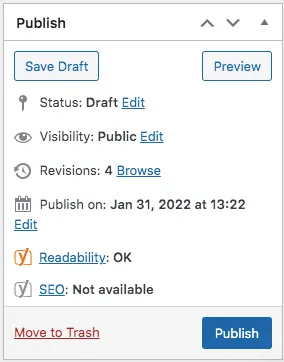
The first button the content manager will see in this section is the “Save Draft” button and the “Preview” button. As content managers, the preview button will be their best friends. The save draft button allows the manager to save the current draft. Clicking the “Preview” button will open up a preview of the most recent draft in a new window. This is where managers will see what their page will look like to the public.

If the manager opens a preview and continues to make additional edits on the backend, the preview will have to be refreshed to apply the additional edits.
The status icon tells the content manager the current publication status of the page. The visibility icon tells the content manager what the visibility of the page is whether it is public or private. The public icon allows the manager to schedule when the page will be published.
The copy to a new draft link opens up a copy of the page in a new window. Finally, the Publish button allows the content manager to publish the page and make it available to the public, or what we call, pushing a page to the front end. The content manager will notice that this button text changes from Publish to update when the page is published, which allows the content manager to make changes to an already published page.
-
When the Content manager publishes a page, they will see the permalink appear right below the title of the page in the backend.
This is the URL of the page they just published. They are able to make small changes to the URL by clicking on the Edit button. If the page published is a child page, the parent page will appear in the URL, this is not editable and will always be the case.
URLs should never include spaces, and words should always be spelled correctly. If a content manager has any questions or concerns surrounding their URL, they should reach out to the Marketing & Communications team for guidance.
-
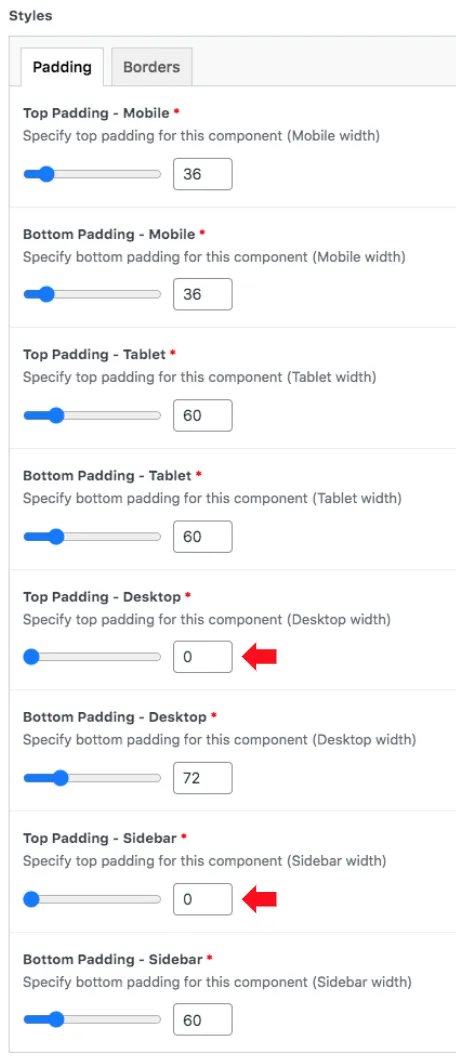
When a content manager adds the first component to the page, they will need to update the component’s top padding. To do this, The content manager will select the Styles tab on the back end of the component.

The content manager will need to change both the Top Padding – Desktop and Bottom Padding – Sidebar to 0. Once the content manager has done this, they can publish the page.
Editing an Existing Page
To edit an existing page, the content manager will click on the page they wish to apply changes to. They will then be taken to the backend of the page where they can perform their edits.
Components can be deleted by double-clicking on the minus sign next to the title on the right-hand side. Clicking the minus once will prompt the site to show you a message asking if the manager is sure they want to remove the content. Clicking it again will remove the content.
Components can be reordered by dragging and dropping them within a content section. To apply all edits made, the content manager will need to click the Update button. Content managers will be able to preview their work by clicking on the Preview Change button. No edits should be published without first checking what they look like visually in the page preview.
URLS of a published page can be changed, but this is not recommended and will likely require a redirect link. To edit the URL of an existing page, please contact the Marketing & Communications team.
-
To share a preview from the backend of a page or post, click on “Preview Changes” in the top right boxed section that reads “Publish”. This will take you to the preview page in a new window.
From this page, you can copy the link in the URL, and share that link with the individual you’d like to share. That individual must be logged into the website, or else they will see a 404 error page.You will not be able to share a preview with a non-user.
-
The page’s template will be dependent on the type of content going on that page. In most cases, content managers will be using sidebar width templates. If you have any questions regarding templates, please reach out to the Communications & Marketing team.
-
- Adding links to Research in the Tabs component to a department page when new research is presented or published.
- Adding an Academic Highlight.
- Adding logos to the Internship/Graduate/Recent Employers tab.
- Adding a Testimonial.
- Adding/Removing a faculty member.
- Adding an Event to a page or program.
- Adding a Form to a page or program or event.
-
No, only one WordPress user is able to edit the backend of a page at once. A content manager will see that a page is currently being edited by another user when they look at the page library. Content managers can take over editing permissions, but this will cause the content manager currently editing to lose all the work they have gained within that revision, so this is not recommended.
Suite A-258

