Suite A-258
-
- Quick Tips
- Basic Media Functionalities
- How to Upload Media
- Attachment Details
- Editing an Image
- FAQs
- Quick Links
Quick Tips
- The maximum upload file size on this website is 63 MB
- Images uploaded into WYSIWYGs will automatically resize to the middle size
Basic Media Functionalities
The media library is where content managers will upload the media that they want to use on the website. Each subsite has its own media library, specific to that subsite.
When users click on the Media icon in the WordPress dashboard, they will be taken to the Media Library, where each of the media uploaded to that specific site is housed.
Across the top of the library, the content manager will see where they can add new media items, sort their media library and search their media files. Media items are listed from newest to oldest by default, but this can be edited based on the content manager’s preferences.
Similar to the Pages and Posts library, the content manager will be able to bulk select media items in an effort to consolidate their organization.

How to Upload Media
Content managers can upload media to the media library by clicking the Add New button to the left of the Media Library. After clicking this button, they will see a new field appear at the top of the page above the media library. This field asks the manager to either drop their files to upload or select files. If the content manager has their computer’s media files open, they can grab and drop that media item into the media library. When the content manager does this, they will see the screen turn a dark blue, and turn into a screen to receive that dropped file.
Clicking the Select Files button automatically opens up the content manager’s files from their computer where can select the media they’d like to upload to the site.

After the content manager selects the media file, they will see it load into the media library. When they click on the media file, they will see the Attachment Details.
Attachment Details
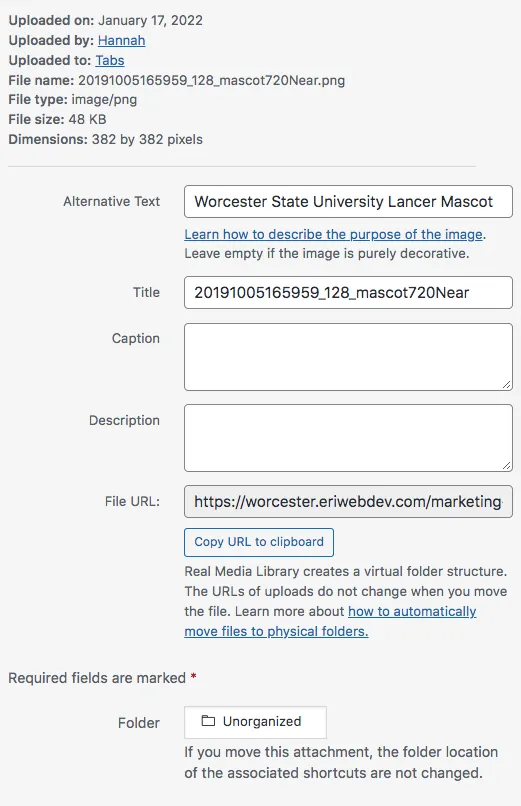
This is where the content manager can check on the media item’s technical details, such as the file upload details in the top right corner. This is where they can check to see when the media item was uploaded, by whom and how large the file is. The file size refers to the overall size of the media file on the server, and the dimensions refer to the actual width and height of the media time in pixels.

Alternative text is where the content manager will insert the alternative text which is for screen readers. This is a crucial step to content management because it relates so closely to the accessibility of the website. If a content manager has any questions about the alternative text they should consult the Web Culture Guide for examples or contact the Communications & Marketing Department.
The title field is where the continent manager will title the media item. This should relate closely with the purpose or corresponding content the media file is being used for. The title of the image should have the title of the page or post it is getting added to.
The next field the content manager will see in the Attachment Details is the caption field. This is where they can add a caption to the media item if necessary. Not all images will need a caption, and whether or not they do will depend on the content on that page or post. The same goes for the description field.
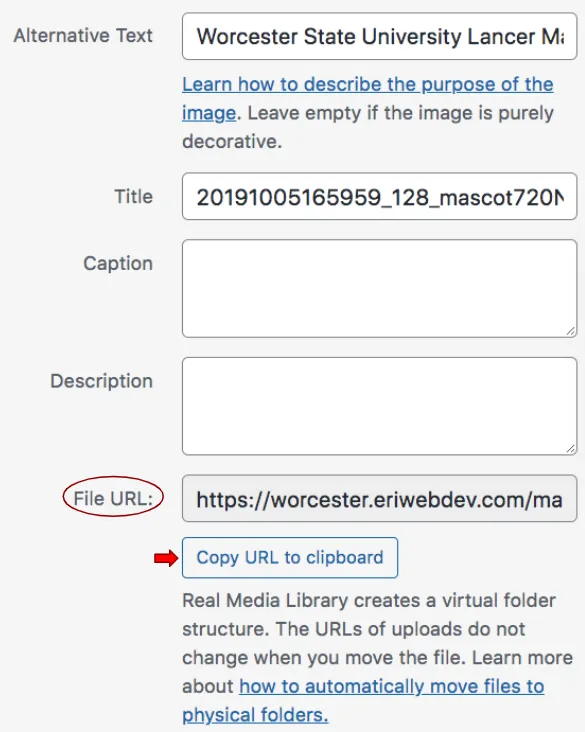
The file URL is the URL of this media item on the website. If they paste the image URL into their browser, they will see the full-size original version of the image uploaded. This is how media such as Videos and PDFs are added to website pages and posts.
The user will then be able to mark which folder they want this particular media file to belong to. Below this, the content manager will see three links, reading View Attachment Page, Edit More Details, and Delete Permanently. Clicking the first link will show the content manager the media file opened in a new tab. the second link will allow them to edit the media details further, and the last link will delete the media library from the subsite.
Image Details
After an image is uploaded into a page or post, content managers are able to edit it’s display settings, or how the image appears on the front end.

In this section, users can quickly adjust the image’s size, without editing the original file uploaded to the website. There are 4 different image sizes that WordPress allows the manager to set:
- Thumbnail size (150 x 150 pixels)
- Medium size (maximum 300 x 300 pixels)
- Large size (maximum 1024 x 1024 pixels)
- Full size (the original size of the uploaded image)
- Custom Size (users can select the custom pixel dimensions)
Content managers are also able to select the image’s alignment within the component and add links to images if necessary
Editing an Image
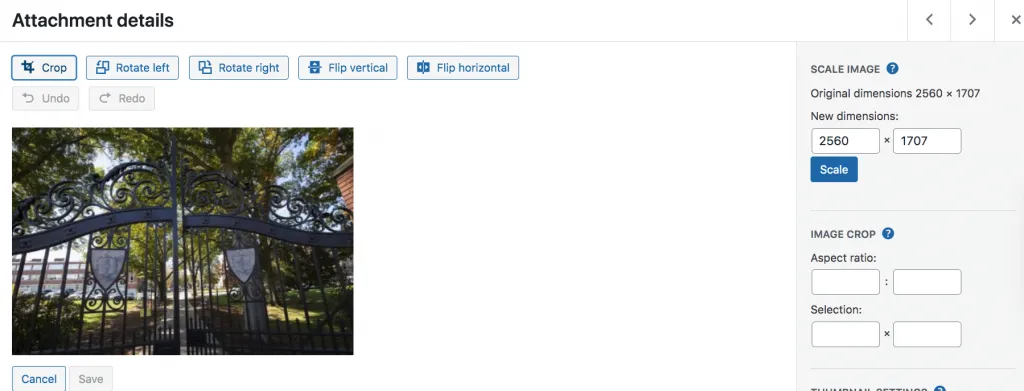
Beneath an image in Attachment details, the content manager will see a button that reads Edit Image. Clicking this will take the user to the WordPress image editor. From here, managers will be able to edit the image in a few different ways, including cropping, rotating, flipping. The content manager also has the option to scale the image.
It is not recommended that images be edited in the WordPress image editor. It is not the easiest tool to use, and the editing is often not precise and buggy.
It is recommended that content managers use their own computer’s image editor if they need to perform a small edit to an image. Any larger edits should involve the Communications & Marketing team to ensure quality is not lost in the editing process.
FAQs
-
When it comes to inserting an image on a website, the bigger the photo the better. Larger photos lead to fewer issues with resolution. The optimal file size for images is no more than 200 KB, and for header images, between 1500 pixels to 25000 pixels wide, and for most other images a max-width of 800 pixels.
Content managers will not be able to add a photo to the page header unless the image is large enough, WordPress will not allow the manager to select an image that is too small.
The best logo size is around 250px wide by 100px high and no larger than 320 pixels wide by 70-100 pixels high.
-
PDFs are added to content like links, so this is where the media URL comes in handy. Upload the PDF document to the media library and copy the URL to your clipboard.

Then, add a link to the text and select the link to open in another tab.
-
- JPEG (JPG) is an image that is compressed to make it a smaller file. Compressing this file does sometimes create a loss of quality, but JPEGs are one of the most common image files on the internet.
- JPEGs should be used when the content manager has a photograph to upload because these image files have high color sounds. JPEGs should also be used if the file needs to be smaller because they allow for smaller file sizes.
- PNG images are not compressed, and work well with high-contrast images.
- PNGs should be used when the crispness of the image is necessary, such as illustrations, screenshots, and logos. PNGs also preserve transparency, which will be crucial for adding logos to Tabs.
- JPEG (JPG) is an image that is compressed to make it a smaller file. Compressing this file does sometimes create a loss of quality, but JPEGs are one of the most common image files on the internet.
Suite A-258

